Outbuild is online scheduling software to work together on connected project schedules and look-aheads, enabling everyone to move faster.
Key Takeaways
Table of contents
- Understanding the Basics of the S Curve
- The Importance of S Curves in Project Management
- How to Create an S Curve for Your Construction Project
- Analyzing Project Performance with S Curves
- Common Mistakes to Avoid When Using S Curves
- Tools and Software for S Curve Analysis
An unexpected snowstorm. A hike and lumber prices. Missing a permit at just the wrong time. These are just a few of the things that can seriously set a construction project back on budget and time. And with project prices going up, margins are thinner than ever. You can't predict the future, but you can map out exactly how much time and money you expect each phase of a project will take. If you've got those numbers down, then you can start to budget time and money for surprises.
The problem is that a huge spreadsheet of projected costs and timelines, each tracking different aspects of the project, make for a nearly indecipherable mess. Thats where the S curve comes in. The S curve for construction progress is a way of visualizing the progress of a project, and it serves as a powerful tool in making sure your project stays on track.
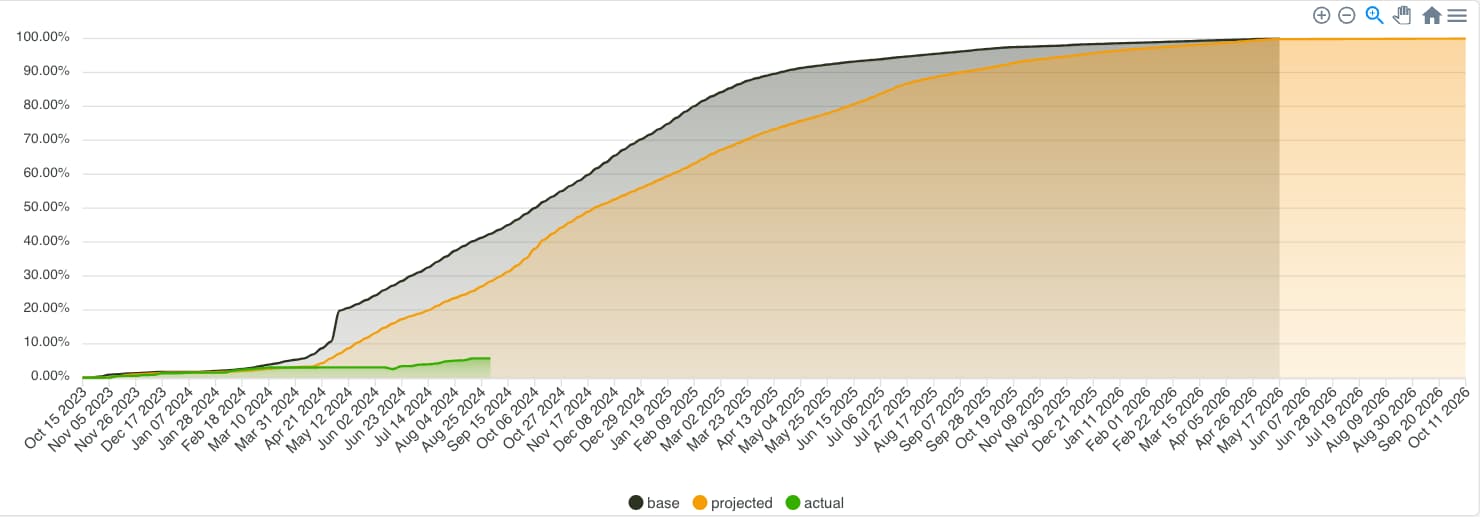
So, what exactly is an S curve in construction? In simplest terms, it is a line graph that represents your project over time. The horizontal x-axis represents time, while the vertical y-axis represents project progress, also called earnings. Those earnings could be in labor hours, dollars and cents, or benchmarks like completing the foundation or the electrical system. It all depends on the type of S-curve graph you're working with. Check out the S curve construction samples here to get an idea of the kind of data they show.

The S curve in construction project management gets its name from the S shape you'll see in most projects. The project starts slow, with little progress and low cost during the initial planning phase. Then, costs and progress ramp up quickly during the physical construction. Finally, progress and costs level off once again near the end of the project when the crew puts on the finishing touches.
At first, it might seem like an S curve is not particularly useful. Obviously, average projects start slow, ramp up, and then are slow at the end. The construction schedule and S curve are where the tool becomes useful. When your projection doesn't fit the S-shape, you know it's time to troubleshoot.
For example, maybe a project has specialized fixtures that will cost five times normal – you’ll spot that on the S curve as a vertical jump on the y-axis. Or, what if the project is in a school where you can only work during school vacations? That will make your S curve look like a set of stairs with repeated flatlines on the x-axis. Having a holistic view of the project and the unique aspects that you anticipate will impact time and budget.
With that gained insight, you can better optimize your plan. Maybe you order those fixtures over a few months so the budget doesn't take such a big hit at once. Or maybe you look into project sequencing so you can keep working on the school even when classes are going on. Even if you can't make adjustments, an s-curve means you can let the project owners know what to expect. It's always better to avoid blindsiding a project owner with surprise costs or delays. And, when owners know about the overall state of the project at the beginning it allows them to take the time they need to make informed decisions.

While the basic concept of an S curve is pretty straightforward, there are quite a few factors to consider when making one. Let's say you are starting an office project in the suburbs of a major city. Strip-mall set up – the kind of place with a lot of law and dentist offices. With that in mind, we can break the process down into a few steps to make sure we're getting the information you're looking for.
Step 1: Define the scope
First, you need to sit down with your project owner and hammer out a firm idea of exactly what they are looking for. Note specific milestones, hard deadlines, and important deliverables like foundation completion or glass installation. This step also involves going over the plans carefully to make sure you are not missing anything important.
Step 2: Collect relevant data
Once you have a clear idea of what the owner wants, you can start assessing how realistic it is. Factors like estimating material costs in the current market, checking on the availability of local subcontractors, and anticipating environmental delays like seasonal changes are all relevant. By the end of this step, you should have a list of expected item costs and a date when you’ll need to make that purchase. Collecting all this information should give you a data set to plug into the S curve later on.
Step 3: Set the X and Y axis
From the first two steps, you should have an idea of your timeline and budget - this will tell you the scale of your S curve. If you have a year to finish the project, then the x-axis will be a year. You can break that year down into months, weeks, or even days, depending on how precise you need the information to be. If your budget is $4 million, then your y-axis will reflect that. But remember that there are variations in S curves as well. For example, maybe you are expecting the winter months to be particularly tricky in regards to days the site can be working due to snowstorms. In that case, you might make a second S curve with an x-axis from November to March and a y-axis that only tracks cumulative labor hours so you can focus on that particular issue. You can have more than one S curve for a project – and sometimes it's a really good idea.
Step 4: Plot the data set
Now that you have a good set of data and established parameters, you can plug the data into your S curve. There are a lot of software options that can help you here that we’ll get into later, but basically, you are putting a dot on the graph for every project cost. The y-axis is how much it adds to the overall cost, and the x-axis is when you expect that cost to come up. This gives you a collection of dots that you can connect with a line to make the s-curve.
Step 5: Analyze the results
This is where the rubber meets the road. Before you start your project, the S curve can help you spot areas of concern. For example, if your data shows that there are next to no costs in the first nine months and then massive spending in the last three, you need to double-check your data and rework your S curve construction schedule. However, the S curve isn’t only useful in the pre-construction phase. Now that you know how to make one, let's look at how you can analyze ongoing project performance with the S curve to keep you on track.
The 10,000-foot perspective that an S curve in construction management gives a project lets you spot problems early, measure key performance indicators (KPI), and take corrective action before small problems become big ones. The simplest application of an S curve is overlaying the S curve projection you created at the start of the project with an actual S curve using data from the site. When you see the lines diverge, that is where you look for the cause. For example, maybe there weren’t as many snowstorms as you expected which means you are hitting material costs sooner.
Whatever the issue, the S curve makes it easy to spot because you know exactly when the variation happened and can go look at detailed reports from that timeframe. You should also update the S curve with new real-world data as you go to keep project owners informed on expected completion dates. While S curves are extremely useful, there are some common mistakes you need to be careful to avoid.

Possibly the most common mistake is assuming that the relationship between time and cost will remain linear. Even if the S curve projection shows steady progress through the middle of the project, reality often has other ideas. Any delays or surprise costs will change the cost/time relationship – so you’ve got to keep a close eye on the S curve.
Ignoring outside factors is also a common problem. Often, we might not think to put events into the S curve when they do have an impact. For example, a subcontractor getting stuck in a traffic jam might lead to cement pouring delays, which then increases cost and delays the framers and so on down the line.
Data is also a major area where mistakes happen. The more data updates you miss, the less useful the S curve is. That missed data can lead to bad decision-making later on. The same is true for inaccurate data – sure, the projection is a guess, but you need precise data in the actual S curve to make sure it gives you good insights.
For an S curve to be useful, it has to be accurate and easy to understand. While you can tackle trying to build one in general spreadsheet software like Excel or Google Sheets, managing that many moving data points can be a nightmare.
A slightly better approach is to find software designed for S curve analysis and data visualization. Tools like Praxie, Tableau, and Power BI can work together to build an S curve that is easy to understand, but you still are dealing with multiple pieces of software, which means importing and exporting a lot of data. Most S curve software was not designed with construction in mind, so it's on you to program in all the data parameters and make them fit your needs. For the most streamlined process look for tools designed for S curves in construction.
Outbuild has powerful analytic tools that combine analysis and visualization into a single system created with construction management in mind. This means that the system comes equipped with the needed parameters, saving you time and preventing errors. Outbuild’s analytic suite also offers other tools including percent roadblock removed to track team effectiveness, and reasons for variance that can tell you the impact of RFI’s, inspections, or change orders on the project overall.
If you’re ready to maximize the impact of the S curve, consider Outbuild’s 14-day free trial and get started on your project planning.
Frequently Asked Questions
Related Articles
Ready to see Outbuild?
Join hundreds of contractors from 10+ countries that are saving money by scheduling better
We’ll be in touch soon!


